Monday, 26 April 2021

Space Dwarf

Having built my Space Devils the other week, I was still in the mood for kitbashing with the new Stargrave sprues. Fortunately, the sample Crew sprue had arrived, so I had even more options to play with!

I love Dwarves in Fantasy, and I love Space Dwarves in Sci-Fi. Normally, I'm not interested in 'Fantasy in Spaaaace', but there's something about Dwarves that transcends that. Perhaps it's the 'dour engineer' stereotype meshing so well with the classic Fantasy Dwarf stereotype. Whatever it is, I have no problem with Space Dwarves even though I might scoff at Space Elves/Orcs/Goblins/etc.

I've been sat on a box of GW's Kharadron Overlords Arkanauts for quite some time, without really having any plans for them - I like their boiler-suited look, and some of them aren't overloaded with bits, pieces, gubbins, and skulls. All told, a cracking starting point for a more industrial Space Dwarf. To this, I added one of my favourite heads from the Ghost Archipelago Crew sprue (the last time I used this particular head, I managed to mangle an ear... happily, I avoided that this time!). The arms are both off the Stargrave Crew sprue - I've been waiting to use this shotgun since I saw the digital renders! This was the trickiest part of the kitbash. While the separate supporting arms make porting across to different kits easier, the Arkanaut body is very wide, and the flat surfaces where the arms attach slope in towards the chest. I had to flatten those surfaces out a bit, and actually used a different supporting arm than the one intended for use with that particular shotgun. A little slicing and filing, and the judicious application of polystyrene cement, and it's worked out pretty well!

Incredibly chuffed with this guy, and looking forward to getting him painted up!

***
Disclaimer: All links to third-party sites are solely for the purposes of sourcing the products I have discussed, if anyone is so inclined. I have simply linked to the original manufacturer or the source I used (but feel free to shop around!) and make no money from people clicking through.

Monday, 12 April 2021

Space Devils

I've been in a real lull minis-wise recently (since, umm... July), but am, finally, back on the horse! 

The other day, I got a parcel containing something I've been eagerly awaiting for months - a pair of test sprues for the Stargrave Mercenaries and Troopers (still not seen the Crew!). Having checked these to get them rolling for production, I couldn't resist kitbashing a few crewmembers. Naturally, I also couldn't resist mixing in a variety of components from other kits...

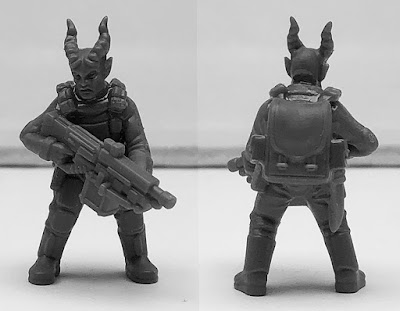
I've always had a soft spot for Star Wars' Devaronians - the space-demon-looking chaps. No idea why, really - I just like the look!

Devaronian, by William O'Connor, from The New Essential Guide to Alien Species

Fortunately, I also happened to have a sprue of the Frostgrave Demons, which includes a couple of heads that work perfectly for Devaronians and also fit nicely with the Stargrave figures in terms of neck joint and scale.

My first one was a simple kitbash - Trooper arms on a Mercenary body with a Demon head. The only work that was needed for the head was to flatten off the ball joint on the bottom of the neck a bit to both reduce its length and fit better in the socket on top of the body. He's not quite finished - I still need to base him (once I've decided how I want to do that) and drill out the gun barrel.

Having got this guy done as proof-of-concept, I decided to try something a little more involved for my second one. The base elements of this second Devaronian were the same - Demon head, Mercenary body, Trooper arms (this time the machine gun from the sprue). Given that he was toting a big, ammo-chewing gun, I dug out the large backpack from the Frostgrave Knights sprue. This didn't quite fit flush to the back of the Mercenary body, but a little bit of filing and carving soon fixed most of that, while a knife from one of the Stargrave sprues filled a small gap and some ammo pouches from a Bolt Action sprue over each shoulder helped make it feel a little more heavy-duty. At this point, I felt that the backpack itself was a bit plain, so I found some random pouches from my bits box and mounted them to the sides.

Really enjoyed both of these and am very happy with how they came out. My kitbashing was a little rusty after going so long unused, and my use of polystyrene cement was a little heavy-handed, but it's good to be back!

***
Disclaimer: All links to third-party sites are solely for the purposes of sourcing the products I have discussed, if anyone is so inclined. I have simply linked to the original manufacturer or the source I used (but feel free to shop around!) and make no money from people clicking through.