Showing posts with label Plastics. Show all posts

Tuesday, 2 April 2024

Token Effort

With a scenario for the Salute demo game of The Silver Bayonet: Egypt planned, we were missing just a few things - namely, objective tokens and clue markers! With a couple of weeks to go, I knuckled down and produced a few using random bits and pieces from my collection.

The skeletal pieces came from the Oathmark skeleton kit, with a bit of clipping here and there to remove bows and arrows from hands, and the tools from the Oathmark Dwarf Light Infantry. I've had the chests knocking around for a while - I think they're from the Massive Darkness board game. The relic is from a Plague Monks sprue - this is the second time I've used it as a marker (the first being my original Frostgrave treasure tokens - seen here).

As the game is set in Egypt, I thought it'd be fun to model a few things once claimed by the desert sands and wanted to give the impression that some of these are half-buried. One of the chests was clipped at an angle to appear somewhat sunken and a couple of spare sections of sprue were added to provide the framework for various drifts and pits.

The sprue frameworks were, in hindsight, a great addition - Polyfilla (my basing material of choice) is great, but giving it something to hang on made life a lot easier than just trying to sculpt with it!

Painting was fairly quick, and mostly completed over the long Easter weekend. In an effort to make the pieces pop a little more, I went back after the usual all-over brown wash and touched up the sandy areas with a bit more khaki and the bones with a flick of white.


I wouldn't say they're my best work, but I hope they're fun and easy enough to spot on the tabletop! One thing I have absolutely learned - I need a painting handle or something. Trying to keep hold of these was more faff than I really wanted!


*** 
Disclaimer: All links to third-party sites are solely for the purposes of sourcing the products I have discussed, if anyone is so inclined. I have simply linked to the original manufacturer or the source I used (but feel free to shop around!) and make no money from people clicking through.

Friday, 24 November 2023

A Fresh Outbreak: Poxwalkers

I'm still no great photographer, but I'm much better than I used to be! I figured it was about time to revisit some of my older pieces from the Choleric Order of the Yellow Bile and update them with some new pics.

First up, the Poxwalkers: original post.

Thursday, 23 November 2023

There Were Rats, Dad...

"There were rats, dad."
"Rats?"
"Yeah. Big ones."

I think my very first GW purchase was the yellow "Monsters" deck from the original Citadel Combat Cards, and it was definitely the start of my love of Skaven. That deck included a picture of one of Jes Goodwin's classic Rat Ogres (I don't think both were depicted, but might be wrong). It's weird that, to this day, I have never actually acquired and painted one (or both) of those classic models... that's something I might have to remedy. When I got my first Warhammer army book a few years later, it was - inevitably - for the Skaven.


Of course, I wasn't able to afford a whole army, let alone have the patience to build and paint one - especially one like the Skaven that demanded huge numbers of troops! By the point where I had the time, attention, and disposable income to indulge my wargaming hobby (thank-you skirmish wargaming!), the then-current Skaven range didn't really appeal to me as much and I found other models more to my liking.

Fast-forward more years than I really care to remember and, with the Choleric Order of the Yellow Bile an appropriate home for them, I decided it was time to paint some rats!


The Plague Monks are one of the older kits still in the Skaven range, and definitely have the older, more bandy-legged design that newer sculpts have eradicated. Still, they are incredibly on-brand for my army, with hunched poses, bandages, ragged robes (that serve to hide their bandy legs), and boil-marked flesh. With the addition of wire spears and some Oathmark Human shields to tie them to my Templars and link them more into the force as a whole, they fit right in.

Painting was a doddle - they're relatively simple sculpts and took to my wash-heavy style nicely. I opted for a really pale flesh tone to offset the darker robes and applied a light red wash to their eyes to give them a rheumy, albino effect.

I have five more of these guys built and ready to go, and I'm toying with the idea of adding some more to the Cult in due course, perhaps a banner, an officer figure, and another three spears to fill out the unit to a full 15.

And, of course, now I also want to track down those old Jes Goodwin Rat Ogres...

*** 
Disclaimer: All links to third-party sites are solely for the purposes of sourcing the products I have discussed, if anyone is so inclined. I have simply linked to the original manufacturer or the source I used (but feel free to shop around!) and make no money from people clicking through.

Wednesday, 15 November 2023

Standard Troops

Hot on the heels of the recent reinforcements for the Choleric Order of the Yellow Bile, I polished off a couple more cult models that have been waiting for ages for a paintjob.

A while back, I realized that my force were looking more militant than I wanted from my cult, so I built a couple of banner bearers to add more of a processional feel (and to add nice focal points to units!).

First up, a banner for the Faithful - thus filling out that unit to a full 20. This was built from - surprise, surprise - Fireforge's Living Dead Peasants, with a banner from some GW kit or another (Skaven, maybe?). The banner-pole was replaced with a wire pike, clipped to an appropriate length.

Yes, the fact that the banner is following the line of the pole and not the dictates of gravity annoys me... but not enough to prevent me from getting it painted!

Added to a unit, I reckon she looks good!
Next up, a banner for the Templars. While the Faithful's banner is relatively modest in size (some might say "sensibly sized"), this one is... objectively too big. I was genuinely concerned that it would not actually stay upright (the metal base isn't the most substantial of counterweights!), but it seems to have held together. Like the other banner, this is from a GW kit - I'm guessing Ogre Kingdoms by the size and the fact that there are random rocks tied to it - and had the banner-pole replaced with a wire pike. The bearer, like the previous Templars, is Oathmark Human Infantry with a head from the Frostgrave Cultists kit.

Both these models (the Templar one especially) reminded me of why I dislike painting yellow. On a small scale (the Templar cowls, a spot colour on a cultist's clothing, etc.), it's fine, but on bit sections like this, it just doesn't suit my wash-heavy style. Still, brown wash makes everything better (if not good), and I'm just about happy with it).
I'm not currently sure what insignia or emblems I want on the banners... I might not want any, with the 'purity' of the yellow sheets representing the 'purity' of the Yellow Bile itself... or I might just not have had the right idea yet. I might go back and apply some transfers... but I will not be attempting free-hand!

I kind of want more banners now. And some musicians...

*** 
Disclaimer: All links to third-party sites are solely for the purposes of sourcing the products I have discussed, if anyone is so inclined. I have simply linked to the original manufacturer or the source I used (but feel free to shop around!) and make no money from people clicking through.

Tuesday, 14 November 2023

Cult Reinforcements

I got the urge to paint the other week and, with my Blood Bowl team (more on that later) still en route from Spain, I turned my attention to some reinforcements for the Choleric Order of the Yellow Bile that had been patiently sat waiting for a lick of paint for a looooong time (so long, in fact, that I can't remember when I kitbashed them).
Like the previous cultists (here and here), these were built from Fireforge Games' Living Dead Peasants, which, alongside their regular non-undead 'Folk Rabble', really are the gift that keep on giving! Four of them received wire spears, and one was built as a dual-wielder, so that I have a readily identifiable 'officer' for each stand should I need one.

That said, I doubt that I'll ever field a whole unit of spear-armed cultists, so I'm going to sprinkle these amongst the other rabble, giving the whole unit an even more ramshackle look.

These five bring my unit of the Faithful to 19 figures (including their two Magisters), so I have just one more to go...

*** 
Disclaimer: All links to third-party sites are solely for the purposes of sourcing the products I have discussed, if anyone is so inclined. I have simply linked to the original manufacturer or the source I used (but feel free to shop around!) and make no money from people clicking through.

Wednesday, 27 September 2023

Slinkers and Stinkers

It has taken me altogether too long to get these four models finished off! They've sat on my desk for months in various stages of completion, and I'm kind of glad to have finally got them done.

They're Ur-Ghuls from the Blackstone Fortress box, and while I love the aesthetic and design, I really dislike the fact that there are only two poses that are incredibly similar. I would love a box with these creepy blighters in a wider range of poses, creeping and skulking their way across the tabletop.

The only alteration I made to the base model was filling in the deep holes above the mouth with some liquid green stuff, smoothing out the head a bit more. Painting was quick - I used a really diluted glaze to apply the purple tone over a light grey basecoat, then dry-brushed on a couple of lighter greys.

On that note, I've become a complete convert to using makeup brushes for dry-brushing and now have a set of about a dozen in various sizes for about half the price of a single hobby-specific one.

As to what these are going to be used for... well, they're perfect weird mutants for hunting my Stalkers, weird aliens for Stargrave, Nullmen for Frostgrave, and they may or may not make an appearance in future Rangers of Shadow Deep games...

***
Disclaimer: All links to third-party sites are solely for the purposes of sourcing the products I have discussed, if anyone is so inclined. I have simply linked to the original manufacturer or the source I used (but feel free to shop around!) and make no money from people clicking through.

Monday, 28 February 2022

Heavy Lads

So it goes again - back to models after a long layoff. In between a few smaller ideas (which I hope will grace this blog soon), I have revisited the Nameless Army, adding a bit more weight to the force in the form of five heavy infantry.
Unlike the standard Nameless Army troops, who are fairly stock models from the Fireforge Northmen kits, these chaps are made from a fairly eclectic mix of parts. The legs and arms are from the Fireforge kits, but the torsos are from GW Greatswords with the skulls and wreaths on the breastplates filed off. These parts didn't mesh up especially well - the GW torsos are designed to sit on much more narrow-hipped legs, so I carved back the hip area on the legs to blend them in a little better. The join between the two was still a little severe, so I added some tassets repurposed from the Van Saar gang shoulder-pads to help balance out the two elements. Only one of the tassets ended up wonky, so I ensured that it was covered by a tightly held shield arm.
Very wonky tasset at bottom right. Slightly less wonky tassets everywhere else.

The heads came from Anvil Industry's Daughters of the Burning Rose. Though intended for Gothic SF, these visored barbutes are perfect for Fantasy and fit nicely alongside the helmets worn by the rest of the force (they also have hooded versions if I ever want to do something more Templar-y). I did need to do a bit more carving to enlarge the neck sockets on the Greatsword torsos and, as the heads are resin and I wasn't convinced by the contacts between the elements, I pinned all of them in addition to super-gluing.
They're not perfect, and the smalls of the back still attest to the fairly significant size different between the tops of the legs and the bottoms of the torsos, but I'm pretty happy with them! Once painted, they will add a much-needed bit of hitting power to the Nameless Army, lending support to the single five-man unit of swordsmen I currently have.

***
Disclaimer: All links to third-party sites are solely for the purposes of sourcing the products I have discussed, if anyone is so inclined. I have simply linked to the original manufacturer or the source I used (but feel free to shop around!) and make no money from people clicking through.

Monday, 10 May 2021

Chernobog

The kitbashing urge remains strong... even as the painting urge remains zero! Fortunately, the Stargrave plastics offer ample opportunity to muck around with plastic and build some random stuff!

Since I first saw the AK-looking weapon in the Mercenaries kit, I've known that it would eventually find its way onto a Stalker-type model to accompany my existing zone raiders. Moreover, one of the torsos in the same kit (the one with the chest pouches) was a vaguely near-future SOF-style get-up. I even grabbed a helmeted head, backpack, and grenades from the same kit, causing me to worry that I was building a 'stock' figure for the first time in ages!

Fortunately, my desire to add stuff to the model to really kit him out like a seasoned zone raider meant that I had to dive into my bits box to find some random gubbins. There's a Geiger counter bit of tech on his left hip that's off the Necromunda Van Saar sprue, and a bedroll from... somewhere. Canteen, holstered pistol, knife, and a couple of extra pouches from various Warlord WWII kits rounded out the ensemble.

So, I give you Chernobog, an ex-Spetsnaz operative, now active in and around the Zone. 

Still need to finish off a couple of things (filling some gaps with green-stuff and drilling out the gun barrel), but otherwise he's ready for basing and painting!

***
Disclaimer: All links to third-party sites are solely for the purposes of sourcing the products I have discussed, if anyone is so inclined. I have simply linked to the original manufacturer or the source I used (but feel free to shop around!) and make no money from people clicking through.

Monday, 26 April 2021

Space Dwarf

Having built my Space Devils the other week, I was still in the mood for kitbashing with the new Stargrave sprues. Fortunately, the sample Crew sprue had arrived, so I had even more options to play with!

I love Dwarves in Fantasy, and I love Space Dwarves in Sci-Fi. Normally, I'm not interested in 'Fantasy in Spaaaace', but there's something about Dwarves that transcends that. Perhaps it's the 'dour engineer' stereotype meshing so well with the classic Fantasy Dwarf stereotype. Whatever it is, I have no problem with Space Dwarves even though I might scoff at Space Elves/Orcs/Goblins/etc.

I've been sat on a box of GW's Kharadron Overlords Arkanauts for quite some time, without really having any plans for them - I like their boiler-suited look, and some of them aren't overloaded with bits, pieces, gubbins, and skulls. All told, a cracking starting point for a more industrial Space Dwarf. To this, I added one of my favourite heads from the Ghost Archipelago Crew sprue (the last time I used this particular head, I managed to mangle an ear... happily, I avoided that this time!). The arms are both off the Stargrave Crew sprue - I've been waiting to use this shotgun since I saw the digital renders! This was the trickiest part of the kitbash. While the separate supporting arms make porting across to different kits easier, the Arkanaut body is very wide, and the flat surfaces where the arms attach slope in towards the chest. I had to flatten those surfaces out a bit, and actually used a different supporting arm than the one intended for use with that particular shotgun. A little slicing and filing, and the judicious application of polystyrene cement, and it's worked out pretty well!

Incredibly chuffed with this guy, and looking forward to getting him painted up!

***
Disclaimer: All links to third-party sites are solely for the purposes of sourcing the products I have discussed, if anyone is so inclined. I have simply linked to the original manufacturer or the source I used (but feel free to shop around!) and make no money from people clicking through.

Monday, 12 April 2021

Space Devils

I've been in a real lull minis-wise recently (since, umm... July), but am, finally, back on the horse! 

The other day, I got a parcel containing something I've been eagerly awaiting for months - a pair of test sprues for the Stargrave Mercenaries and Troopers (still not seen the Crew!). Having checked these to get them rolling for production, I couldn't resist kitbashing a few crewmembers. Naturally, I also couldn't resist mixing in a variety of components from other kits...

I've always had a soft spot for Star Wars' Devaronians - the space-demon-looking chaps. No idea why, really - I just like the look!

Devaronian, by William O'Connor, from The New Essential Guide to Alien Species

Fortunately, I also happened to have a sprue of the Frostgrave Demons, which includes a couple of heads that work perfectly for Devaronians and also fit nicely with the Stargrave figures in terms of neck joint and scale.

My first one was a simple kitbash - Trooper arms on a Mercenary body with a Demon head. The only work that was needed for the head was to flatten off the ball joint on the bottom of the neck a bit to both reduce its length and fit better in the socket on top of the body. He's not quite finished - I still need to base him (once I've decided how I want to do that) and drill out the gun barrel.

Having got this guy done as proof-of-concept, I decided to try something a little more involved for my second one. The base elements of this second Devaronian were the same - Demon head, Mercenary body, Trooper arms (this time the machine gun from the sprue). Given that he was toting a big, ammo-chewing gun, I dug out the large backpack from the Frostgrave Knights sprue. This didn't quite fit flush to the back of the Mercenary body, but a little bit of filing and carving soon fixed most of that, while a knife from one of the Stargrave sprues filled a small gap and some ammo pouches from a Bolt Action sprue over each shoulder helped make it feel a little more heavy-duty. At this point, I felt that the backpack itself was a bit plain, so I found some random pouches from my bits box and mounted them to the sides.

Really enjoyed both of these and am very happy with how they came out. My kitbashing was a little rusty after going so long unused, and my use of polystyrene cement was a little heavy-handed, but it's good to be back!

***
Disclaimer: All links to third-party sites are solely for the purposes of sourcing the products I have discussed, if anyone is so inclined. I have simply linked to the original manufacturer or the source I used (but feel free to shop around!) and make no money from people clicking through.

Thursday, 2 July 2020

Good Boys

Having built and painted the kennelmaster, it was a somewhat tough wait for his hounds to arrive! Fortunately, Otherworld Miniatures delivered two packs of their war dogs really quickly (many thanks, Otherworld!), so he wasn't long without his best friends.
These were the first metal miniatures I'd worked with in quite some time, but there was barely a mould line to be scraped away - really lovely, clean sculpts. The paintjob was basic, but is nice enough in person, though I cannot, for the life of me, take a decent photo of them!
And that's it - the last unit I currently have planned for The Nameless Army. There will be more, I have no doubt, but it's time to move onto something different for a bit. Of course, I am waiting on a couple of upcoming kits (no spoilers) that are earmarked to provide characters for the force, so there's a good chance they spin out into full units, and I have just caught myself thinking "maybe they need an artillery piece...". And I do quite fancy adding some more light infantry, perhaps in the form of scouts and militia. Yeah... this isn't over, is it?

***
Disclaimer: All links to third-party sites are solely for the purposes of sourcing the products I have discussed, if anyone is so inclined. I have simply linked to the original manufacturer or the source I used (but feel free to shop around!) and make no money from people clicking through.

Thursday, 25 June 2020

Doggone!

This chap, thrown together using parts from the Fireforge Folk Rabble kit and the head from an Oathmark Human, marks the first of the final five models currently planned for The Nameless Army.
He's a kennelmaster, and will be joined in due course by a pack of hounds. Right now, he is armed with little more than a staff and a ferocious moustache. His mutts are under way, and should be finished soon, but I got this guy started while waiting for them to arrive.

The staff is just a metal spear cut to size. While he's painted to match the light infantry, I wanted a slightly less 'rank-and-file' feel, hence opting for a less military choice of equipment and a slightly more flamboyant head.
All told, I'm really pleased with how well he came out, considering the simplicity of the model!

*** 
Disclaimer: All links to third-party sites are solely for the purposes of sourcing the products I have discussed, if anyone is so inclined. I have simply linked to the original manufacturer or the source I used (but feel free to shop around!) and make no money from people clicking through.

Wednesday, 17 June 2020

Light Relief

Having polished off six of the ten planned light infantry for The Nameless Army last week, I ploughed straight into the remaining four this week. I've praised Fireforge's range before for being a delight to paint, but I can't remember the last time I knocked models off my desk so quickly. Granted, the paintjobs won't win any awards, and I'm not going to get them on the table any time soon, but... I forget where I was going with this...
Having completed the officer alongside the last batch, this lot are just four rank-and-file grunts - two for a nominal front rank (spears lowered), and two for a rear rank with spears grounded. Here's the full unit in all it's glory...
With just four figures for this army that don't come from the Fireforge boxed sets (and which haven't arrived yet... they're due to go into the last of the currently planned units), and just two components (heads) from other kits, this is - hands down - the most consistent force I've ever mustered. Happily (or, at least, reassuringly), the characters will be a much more traditional mix of bits and pieces from all over. They're somewhat in limbo until a certain new release is available so, in the meantime, I'll be moving onto a new project, with the rough ambition of balancing out the Conquistador-y vibe I've been getting from this bunch...
Watch this space...
*** 
Disclaimer: All links to third-party sites are solely for the purposes of sourcing the products I have discussed, if anyone is so inclined. I have simply linked to the original manufacturer or the source I used (but feel free to shop around!) and make no money from people clicking through.

Friday, 12 June 2020

Trip The Light Fantastic

So, it took me about two weeks to complete my last batch of figures for The Nameless Army... this latest batch of six (out of ten) light infantrymen took me about two days to paint. They'd have been up sooner, but just needed basing.
I covered how the troops were built in my last blog, and there's not a huge amount to say about the painting - standard job for the officer, Mostly blue-grey for the footsloggers. So, a short and sweet post this time out!

Next up will be the remaining four light infantrymen (they're already mostly painted - just need to finish some details, then they get washed), and a sneaky extra unit I'm going to bash together with a few bits and bobs...

***
Disclaimer:
All links to third-party sites are solely for the purposes of sourcing the products I have discussed, if anyone is so inclined. I have simply linked to the original manufacturer or the source I used (but feel free to shop around!) and make no money from people clicking through.

Thursday, 4 June 2020

Two Horse!

Following on from the previous batch of three cavalry, I have just finished the final two in this little unit of five. As the 20-day gap between the batches shows, I really don't like painting cavalry. Halfway through painting these last two, I got frustrated and built, based, and primed ten light infantrymen to accompany The Nameless Army (more on those later). Still, the horsemen are done now, and I can't see myself adding any more any time soon. Well... maybe a commander...
Trooper (L) and Officer (R)
Here, then, are the final mounted trooper and the officer for the unit. The officer has the now-familiar shoulderpad on his right arm. In the absence of sufficient 'reins-holding' arms (per my previous post about the cavalry kit), the left arms are those I snagged from the other kits. None of the options I had came even vaguely close to looking like they were holding the reins, so this was the pick of a poor bunch. I'm not entirely displeased with them, however - again, I think happiness at having completed this unit is trumping my usual fussiness!

Paint-wise, I opted for two dark brown horses to accompany the various greys I'd done previously. Nothing special, really - dark socks/stockings on one, and a grey/white on the other.
Much as I moan about cavalry, I have to admit that they do look pretty impressive when all is said and done.

Right. Enough horse nonsense... back to the footsloggers! While painting may have paused, productivity did not, and I put this bunch together over a lazy Sunday.
The bodies and arms are from Fireforge's Folk Rabble kit, while the helmets and shields are spares from the various other kits in the range. While the clothing shows slight variation, the helmets are distinct and really tie the unit together (plus, I'll likely give them a more uniform paintjob). The one exception is the unit's officer, who was built entirely from spare parts from the more military-looking kits. He does seem a good bit taller than the rabble he leads, which I kind of like. Unlike the existing officers, he did not get a shoulderpad - I figured that, amongst the light infantry, simply having the armour of a regular infantryman was enough distinction.

25 models painted, 10 more built... and I'm not sick of painting them yet!

***
Disclaimer:
All links to third-party sites are solely for the purposes of sourcing the products I have discussed, if anyone is so inclined. I have simply linked to the original manufacturer or the source I used (but feel free to shop around!) and make no money from people clicking through.

Friday, 15 May 2020

To Horse!

I'm really in the zone with my little force (currently The Nameless Army) and, looking at it, realised that it needed some horsemen to add a little more variety to the rank and file. So, I grabbed a box of Fireforge's Northmen Cavalry to match all my infantry. Now, I really dislike painting cavalry. I've tried doing it with the riders on, the riders off, and never seem to end up with something that I find appealing. The more figures from this range that I've painted, however, the more I've enjoyed them. This is something of a rarity for me, as I tend to see painting as a necessary evil that allows me to put something I've really enjoyed kitbashing onto the table. They're detailed without being fussy, characterful without being over the top, and are really well suited to my minimal, wash-heavy style. If anything was going to help me break my cavalry duck, it'd be this! And it's a really nice kit... with just a couple of minor issues (one self-inflicted, one not!).
The chief annoyance - and the only real criticism I have of an otherwise superb kit - is that while the kit is designed to build six horsemen, not all options are represented equally in the box. For example, the weapon options are sword or spear, and you get six of each. There are six shield arms and six shields. If you don’t want the riders to be carrying shields, you have the option of empty, ‘clutching the reins’ arms… four of them in total. So, assuming you don’t want any of your six horsemen carrying shields, you have to raid two left arms from the command sprue or one of the other boxes – none of which really line up with the reins. Not a deal-breaker, and a more determined modeler could no doubt convert something that worked, but an frustratingly odd choice – especially when the kit offers FOUR banner arms (one on each of the two cavalry sprues, two on the generic command sprue)… but only one banner top (on the command sprue).

Regardless, as I wanted to build light horse, armed with just a spear, I decided to press on and make solving that little matter Future Phil's problem. In due course, I will add two more to this little unit (another lancer and an officer), and probably a mounted commander for the overall force with the remaining options in the box. Because I really dislike painting cavalry, though, I just started with three so that I didn't get frustrated and drag my heels - or, worse, abandon the project (though I confess I did detour a little into another project at one point - more on that later).
So, the kit went together really well - everything was a good fit, there were no awkward "oh, so you can't use that piece with that, I guess" discoveries, and the extent of my conversion work was clipping off the spears, drilling out the hands, and inserting metal replacements. And then I came to basing them and my self-inflicted issue arose. I like a bit of heft to my minis, which is why I tend to use metal discs rather than the plastic ones included in most kits, so I dug out some 40mm metal discs for these horsemen. Had I been using the polystyrene cement to attach the cavalry to the plastic bases supplied, there would have been no issue, but the really small contact points (all three body options have three points of contact, but these are two horseshoes and the tip of a hoof!) did make it a bit of a chore. My superglue-and-greenstuff ‘cement’ should hold them fast, but I can’t shake the feeling that they’re a little flimsy. Oh, for a good, old-fashioned ‘puddle’ base under each hoof!

Painting was really straightforward (as all these kits have been, really). The only real divergence from the infantry was in the horses - I opted for one grey, and one light grey, then added a few little distinguishing features such as socks and stockings. All told, I'm really rather pleased with them, though I'm not sure I'm ready for a whole mounted army just yet!

***
Disclaimer:
All links to third-party sites are solely for the purposes of sourcing the products I have discussed, if anyone is so inclined. I have simply linked to the original manufacturer or the source I used (but feel free to shop around!) and make no money from people clicking through.


Tuesday, 28 April 2020

Robin... The Hooded Man

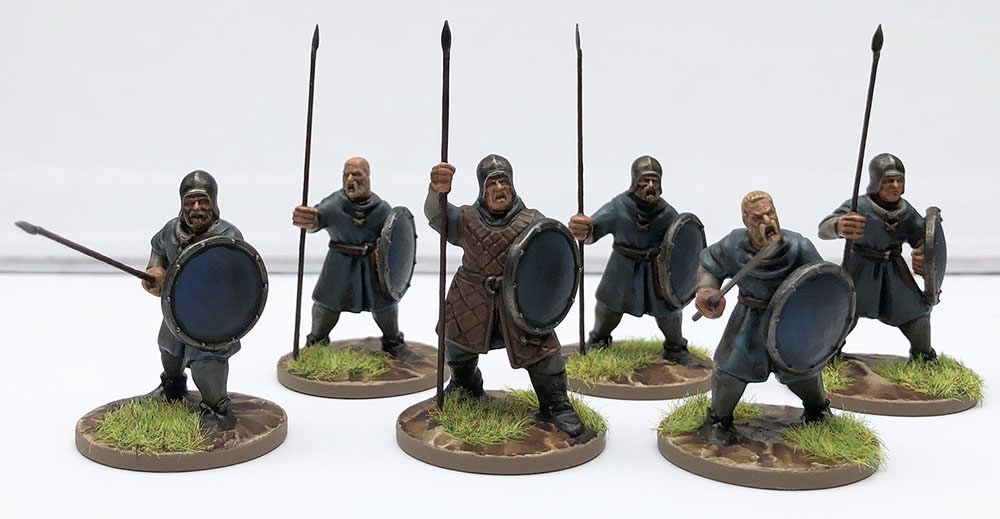
As planned, I pressed on with some archers for my growing (and still unnamed) fantasy force.

I've still got five cavalry to sort out (well, potentially six, as the Fireforge Northmen come in multiples of six, but I've got one of them earmarked as a commander), but these were to be the last five infantrymen produced with the kits I currently have. Unfortunately, these didn't go together as smoothly as the previous figures. Don't get me wrong, the kit is largely spot-on, and goes together well - there were just a couple of things that proved awkward.
Good hoods (and less-good quivers)
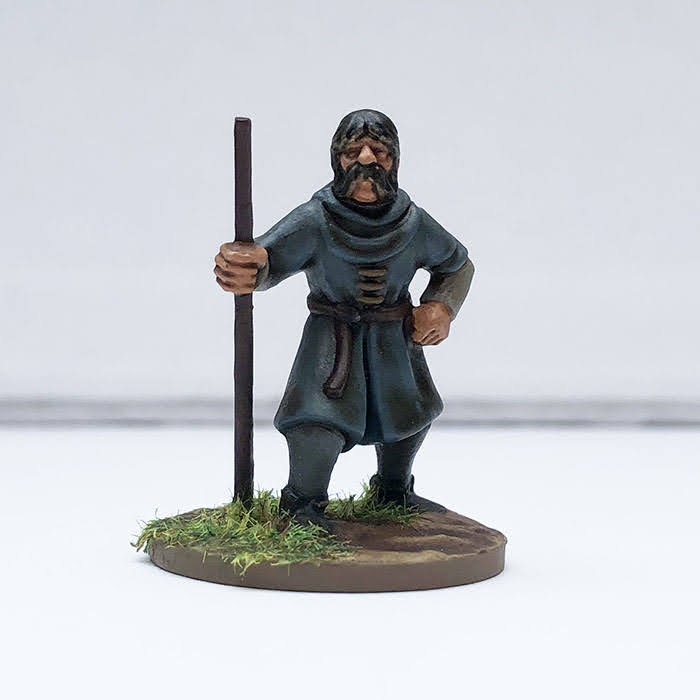
There's a brilliant spot of attention to detail in the kit - most of the torsos have a hood hanging down the back. There are, however, a couple of hooded heads on the sprue... and a couple of hoodless torsos to pair up with them. Lovely stuff. The heads themselves have rather prominent neck joints, and for the bare and helmeted heads in the box, this works perfectly. It does, however, make the hooded heads look a little odd - like they're wearing babushka-style headscarves or open-faced balaclavas more than hoods! They also sit awkwardly alongside the hanging hoods, which seem much larger. Not a massive problem, but it did mean that I had to crack out the greenstuff and bulk up the backs of the necks so that they blended into the clothing more. A bit fiddly, given my skills with greenstuff, but I think they worked out well enough. Much as I like that most of the pikemen are helmeted, I really appreciated the variety of head options in this kit. I mixed in hoods, helmets, and a bare head, chiefly to add more variety to the figures in the 'samey' shooting pose but also to give the unit the feel of a bunch of more independently minded soldiers - though with the uniform elements marking them as part of the overall force.
Newly sculpted hoods - everything below the 'fold' of the hood was built up with greenstuff
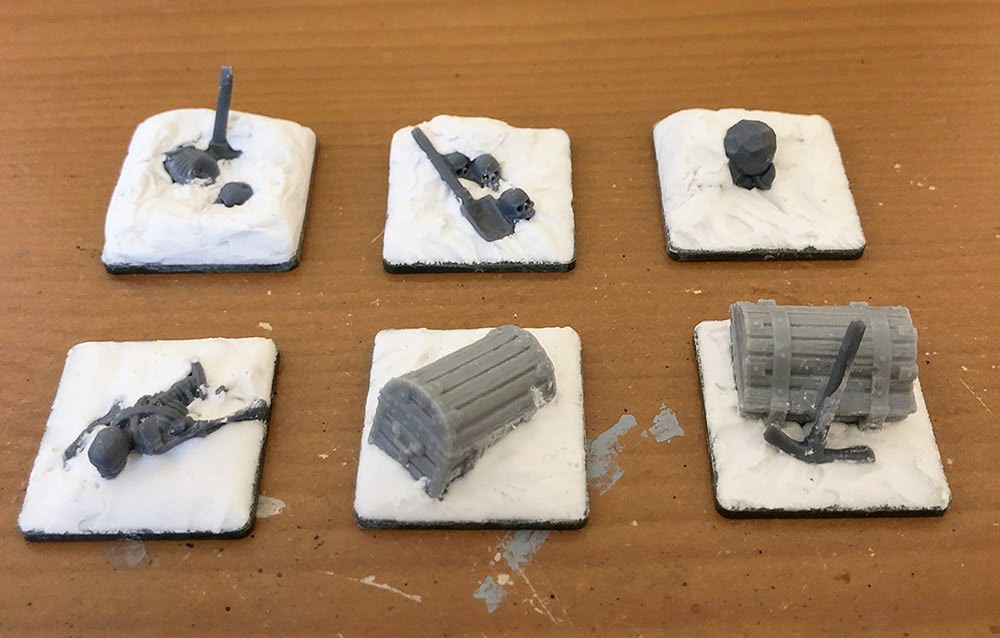
The annoying element, that frustrated me enough that I put the kit to one side for a day, is that the backs of the quivers are concave, rather than flat (as found on most separate quivers). Going by the pictures on the box, the curve is designed to fit around the waist of the figures. Fair enough. Could I get them to stay in that intended position? No, I could not. Cue excessive amounts of polystyrene cement and a fear that I'd obscured too much detail and ruined things beyond saving! I think the break was helpful - once returned to the project, I was a lot happier, and the painted minis don't show the damage I feared had been inflicted.

The irony is that, unlike so many plastic figures, there's plenty of flat space for a flat-backed quiver to sit, thanks to the long padded armour the models are sculpted wearing. Were I to do these over, I'd definitely ditch the included quivers and replace them with something from another kit. In fact, I'd probably also switch the archer torsos with those from the infantry box, as the latter have belts across the chest, and plenty of flat space for a quiver on the back! It'd mean no hoods hanging down, but I could probably live with that. Aaaaaanyway, lessons learned if I ever revisit this kit.
Painting was the usual straightforward approach that's incredibly familiar by this point. At this stage, it's second nature, and I cracked through this little lot over the course of a couple of afternoons. For now, there's just the cavalry left to do. I might take a break for a moment, though, and pick up another project as a palette-cleanser... and to paint something other than blue, grey, and brown!

***
Disclaimer:
All links to third-party sites are solely for the purposes of sourcing the products I have discussed, if anyone is so inclined. I have simply linked to the original manufacturer or the source I used (but feel free to shop around!) and make no money from people clicking through.


Friday, 17 April 2020

Productivity!

We recently enjoyed a four-day Bank Holiday weekend here so, with the sun shining and the garden already pushed back to a manageable (for now!) state, what better way to pass the time than building and painting some new toys? Nine of them, in fact.

I have built up the unit of pikemen from the initial six to a full ten and reinforced them with a unit of five swordsmen.
Unsurprisingly, all the figures are still Fireforge Northmen, though this time I did raid my box of archers to supplement the warriors kit. As before, the pikemen with the levelled pikes were the biggest pain to make. Thankfully, these two will be the last! I'm not planning on another unit of pike for this force and I'm happy enough with two ranks of five (the officer being the extra front-rank figure alongside the chaps with levelled pikes). It's useful to have a secondary officer figure for when I want to split the unit into two groups of five (which will almost certainly be the case given my movement trays), so I threw in another bare-headed figure - if Games Workshop has taught me anything, it's that officers never wear helmets! As it happens, I'm identifying the officers in this force by using some of the officer components from the kits - a torso with a gorget and and arm with a hefty pauldron, so this guy is clearly an NCO. Going forward, the pauldrons may end up on different arms, depending on which pieces I use, but the gorget is a nice, consistent reference point.
The swordsmen were pretty much a straight build out the box, albeit with a couple of archer torsos mixed in for variety (and because the warriors box only builds 12 models) and the head from a Frostgrave: Ghost Archipelago crewman. I almost messed that guy up - after gluing everything together, I spotted a mould line I'd missed on the side of his head. Taking a scalpel to it, I promptly carved a notch out of his ear. Rather than chuck the model or attempt to remove and replace the head, I smoothed things out with some polystyrene cement and decided that he's going to be called "Somebody Half-Ear". As above, he'll probably play the role of NCO if and when I expand this unit to ten.
Somebody Half-Ear and his fellow NCO.
All in all, I'm pleased with them. The figures are pleasingly uncomplicated and they paint up really quickly. In the absence of real inspiration for what I'm going to do for command or character figures for the force, I think I'll just move onto the next unit - archers or cavalry. I suspect the former, as I've not yet decided how I want to base the cavalry.
The force as it currently stands. This picture will eventually be updated with non-soft-focus swordsmen...

***
Disclaimer:
All links to third-party sites are solely for the purposes of sourcing the products I have discussed, if anyone is so inclined. I have simply linked to the original manufacturer or the source I used (but feel free to shop around!) and make no money from people clicking through.


Thursday, 9 April 2020

Pikemen

Last weekend was somewhat productive (by my standards, anyway) and, alongside the reading and gardening, I painted my six pikemen.
I went with a pretty simple paint scheme, and one that, as it happens, is vaguely Stark-like - brown leather armour over blue-grey tunics. I used a couple of different browns for the armour, just for a little variety, and while it's somewhat noticeable on the figures, I should probably have switched to a different wash instead. Where I did use a different (for me) wash was on the armour. Normally, I just use Army Painter Soft Tone over everything, but for these guys I went with Dark Tone on the metal elements. I really like the effect on the helmets - it makes them feel a bit more rough and veteran.

All told, I really like these guys, and will be starting on some swordsmen to accompany them over the Easter Bank Holiday weekend... Unless I get distracted by something else.

I still have no idea what faction these guys will end up forming.

***
Disclaimer:
All links to third-party sites are solely for the purposes of sourcing the products I have discussed, if anyone is so inclined. I have simply linked to the original manufacturer or the source I used (but feel free to shop around!) and make no money from people clicking through.

Friday, 27 March 2020

Untitled Fantasy Project #52

One of the downsides to the recent shift to working from home is that I have one desk, which doubles as a workplace and as a painting station. So, while I'm sat working, I have unfinished projects gazing at me the whole time. I feel judged.

Simply hiding them away wasn't viable, as it turns out that was how I dealt with the last time I faced a somewhat overwhelming backlog of projects, and drawer space is painfully finite. So, it looks as though I have no option but to crack on with them! At least then I'll have painted figures cluttering me up...

So, here are my current figures, six pikemen:
I'm hoping that small numbers (not to mention a uniform... uniform) will help me get them done swiftly before I get distracted and move onto kit-bashing something else.

All of these are from Fireforge Games' Northmen Warriors, from the same range as the cultists in the Choleric Order of the Yellow Bile (found here and here). They're straight out of the Game of Thrones Stark army, and I'm planning on building a small, generic military force that can be pressed into service for a variety of Fantasy games. The real flavour will come with the commanders and characters I add to the force. For now, I'm planning on some clerics and paladins so that this force can be pitted against the very same Choleric Order of the Yellow Bile. I don't have a name for this faction just yet, though (suggestions welcomed!).

Somewhat unusually for me, they're a straight build out of the box (I think the bare head might have come from the Archer pack instead), albeit with the plastic spears clipped off and replaced with metal pikes. I tend to do this with all spear-armed models these days - I generally prefer the less exaggerated look, and the occasional pricking is a small price to pay for the additional heft - so drilling out the hands was a doddle. The only slightly odd one was the arm wrapped around a banner pole (seen in the centre of the rear rank in the photo above), which required a little more carving to get right.

If that one was the oddity, the two levelled pike were the pains in my behind! The original component is both arms and the spear as a single piece, so drilling out the hands and getting everything to level up properly was a bit of bugbear! The effect is great, though, so I'll be doing two more should this unit expand further.

***
Disclaimer:
All links to third-party sites are solely for the purposes of sourcing the products I have discussed, if anyone is so inclined. I have simply linked to the original manufacturer or the source I used (but feel free to shop around!) and make no money from people clicking through.